Microsoft Dynamics Accounting Software User Tips & Tricks

Change your Microsoft Dynamics GP password

To change your Microsoft Dynamics GP password click on the Microsoft Dynamics GP icon on the top toolbar and select ‘User Preferences’.


Untitled

Next, click on the password button located on the right-hand side of the screen:


Untitled2


Type in your old password, then your new password. Lastly, reenter your new password to confirm. Click OK to save your changes.

Untitled3

Now log out and log back in to test your new password. Due to the nature of data stored in Microsoft Dynamics GP, it is highly recommended that users periodically change their passwords.

For more information or additional assistance, please click here to contact us.

Don’t forget to ask about our ‘Introduction to Dynamics GP’ course where you’ll learn about all of the other system wide features!


Expand

Closing the general ledger in Microsoft Dynamics GP 2015

As year-end approaches, many accounting departments prepare for a busy couple of months. There is no need to be anxious about closing the general ledger in GP, as it is really quite simple. In fact, with the release of Dynamics GP 2015 Round 2, we now have even more features to help us get through the process.

To open the year end closing window, let’s navigate to Tools>>Routines>>Financial>>Year End Closing.

YearEnd_screenshot1
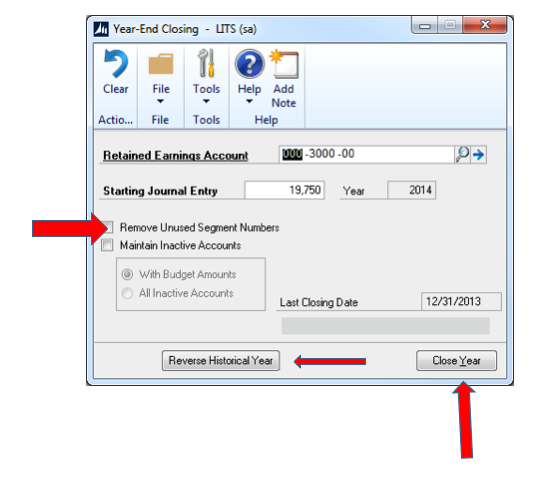
When the window opens you will notice the Retained Earnings account is already filled in. Verify that this is the correct account and change it if needed. This is the account where the net profit/loss (hopefully a profit) will end up. The field ‘Starting Journal Entry’ contains the next journal entry number in the system. This is the number that will be used for the year end closing journal entry. Notice the 2 checkboxes on the left side of the window:

Remove Unused Segment Numbers – Mark this, if desired, to have GP automatically remove all general ledger account segments that aren’t used in an account number.

Maintain Inactive Accounts – If you want to keep inactive general ledger accounts with zero balances, mark this option. Otherwise, those accounts will be deleted during the year end close. If you mark this option, you can then specify to maintain all inactive accounts with zero balances, or to maintain only those GL accounts that contain a budget amount.

You are now ready to close the year by clicking the ‘Close Year’ button on the bottom of the window. The process could take anywhere from a few seconds to several hours. It all depends on how much data you have. As always, make a full backup prior to closing the year.

Notice the ‘Reverse Historical Year’ button on the bottom of the window. This new feature was introduced in Dynamics GP 2015. Clicking this button will undo the most recent year end close. This feature will only be available if you have marked to keep the Account and Transaction history in the General Ledger Setup window.

That’s all there is to it. Remember, although this is a simple process, there are numerous preliminary tasks that need to be completed first. Reviewing the chart of accounts and running database maintenance are just a couple of steps outlined in the GP Year-End Closing checklist.

For more information or additional assistance, please click here to contact us.

Don’t forget to ask about our ‘General Ledger’ training course. You’ll learn about the Year-End Closing process, identifying and fixing variances, automating your allocations, and all the other features in the General Ledger module.

Expand

How to edit a vendor’s 1099 in Dynamics GP 2015 (Great Plains)

As part of the year-end process, many of us are tasked with sending out 1099s to our vendors. Upon review, we often find vendors who were not correctly setup as a ‘1099 vendor’ prior to entering transactions for that vendor. Or perhaps there are some transactions that should only have a portion of the purchase included on a 1099. As a result of this, our 1099s for those vendors will be incorrect. With the introduction of GP 2015, we now have even more options for fixing these records.

Option 1 – Edit the 1099 itself by using the ‘1099 Details’ window

Let’s go to Cards>>Purchasing>>1099 Details (see screenshot 1)

On this window, select a vendor and select a month. In the scrolling portion of the window you will see every available 1099 box. Find the desired box and type in the correct 1099 amount. Remember, the amount printing on the 1099 is cumulative of all 12 months, so you’ll want to add the amounts together to verify the total cumulative total. Now simply click SAVE and proceed to reprint the 1099 (Tools>>Routines>>Print 1099). You will see the revised amount on the reprinted 1099. Making adjustments using this window has no bearing on the vendor’s balance, history or status. It also has no affect on the General Ledger. Rather, it simply changes the amount that prints on the 1099.

Option 2 – Edit individual transactions using the ‘Edit 1099 Transaction Information’ window

Let’s go to Transactions>>Purchasing>>Edit 1099 Transaction Information (see screenshot 2)

On this window, select a vendor. Now mark to include 1099 Debit Transactions, All Debit Transactions, or All Credit Transactions. Once you select the desired option, click the Redisplay button. For each transaction that appears in the scrolling portion of the window, you can change the 1099 Tax Type, specify the 1099 Box, and even change the 1099 Amount. When you click the process button, the transactions are updated in the Open and History tables. Remember, you can use this window to not only ‘add’ 1099 amounts, but also to reduce 1099 amounts. This has no affect on the vendor balance and also has no bearing on the General Ledger.

For more information or additional assistance, please click here to contact us.

Don’t forget to ask about our ‘Payables Management’ training course. You’ll learn everything there is to know about the 1099, 1096, year-end close, and everything else you need to know to manage your payables effectively.
1099_screenshot1

1099_screenshot2

Expand

Help feature for specific windows in Dynamics GP

Have you ever found yourself on a window, looking at a field or a button and not knowing what it is used for? This happens, not only to new users, but to seasoned veterans as well. There are over a thousand windows in GP (or more, depending on which modules are installed) so it is just a matter of time before you find yourself in this situation.

Instead of calling your consultant, or sending a support request to Microsoft (both of which will cost you money) you can use this simple trick.

With the window open:

  • Simply click the F1 button on your keyboard. Alternatively, you can click on ‘Help’ on the window’s toolbar and select ‘About This Window’.
  • The HELP window, specific to the window that is open, will appear.
  • You will see a paragraph explaining what the window is used for.
  • Above the paragraph you will see two links (FIELD and BUTTONS) that are probably blue and underlined.
  • Click each link to see an alphabetical list of the window’s fields and buttons respectively. You will see a short description of each.

This help feature, specific to the window you are on, is designed to eliminate the need to search for your answer. Not only does this provide a quick answer and allows you to move on with your day, but you may also learn other aspects about the window as well. This feature is just one way you can become more self-sufficient with your GP software.

For more information or additional assistance, please click here to contact us.

Don’t forget to ask about our ‘Introduction to Dynamics GP’ training course. You’ll learn about many other free resources that are available to you that can help you on the road to self-sufficiency.

Help feature for specific windows in Dynamics GP

(Click to enlarge)


Help feature for specific windows in Dynamics GP

(Click to enlarge)


Expand

How to restore the toolbar to its original version – Modifying the menu bar (ribbon) in Dynamics GP

With the introduction of GP2013(r2) and then again with GP2015, users are seeing a new design to the toolbar. The new toolbar, called the Action Pane, is comprised of larger buttons that consume a larger portion of the window itself.

This change incorporates the look and feel of the ‘Ribbon’ which is now seen in other Microsoft products, such as Outlook, Excel and Word. Although many users may prefer this new toolbar, we have heard from many of our clients that they prefer the original.

Microsoft, in anticipation of this, has provided the option to reduce the size of the new toolbar, and even the option to revert back to the original.

  • Simply navigate to the user preference window by clicking on the large Microsoft Dynamics GP icon (usually on the upper left of the main toolbar)
  • Select User Preferences from the menu. On this window you will see a field called ‘Window Command Display’.
  • Clicking the drop-down arrow allows you to choose from one of the three options:
  1. Action Pane – The new large style toolbar (First screenshot below)
  2. Action Pane Strip – A smaller version of the new large style toolbar (Second screenshot below)
  3. Menu Bar – The original toolbar that we’ve become accustomed to in all versions prior to GP2013(r2) (Third screenshot below)

Just select your preferred option – remember it is user specific. Then, for the change to kick in, log out of GP and then log back in.

For more information or additional assistance, please click here to contact us.

Don’t forget to ask about our ‘Introduction to GP’ training course that covers all navigation, toolbar customization, shortcuts and other system wide functionality.

How to restore the toolbar to its original version - Modifying the menu bar (ribbon) in Dynamics GP

(Click to enlarge)


How to restore the toolbar to its original version - Modifying the menu bar (ribbon) in Dynamics GP

(Click to enlarge)


How to restore the toolbar to its original version - Modifying the menu bar (ribbon) in Dynamics GP

(Click to enlarge)


Expand

The maximum number of users are logged into the system – Removing a stranded user

As you may or may not know, user licensing for Dynamics GP is based on concurrent use. Simply put, if you own 10 user licenses, only 10 can log in at any time. Once a user logs out, it frees up a license to be used by another user.

From time to time, a user login record may become stranded, or locked, in the table. This can occur due to improper log out of the software as a result of power outage, workstation freeze up, disconnection from the network etc.

When this happens, the user license cannot be used by another user. To remedy the situation:

  • Simply click on the large Microsoft Dynamics GP button (usually located on the upper left side of the main menu)
  • Navigate to Tools>>Utilities>>System>>User Activity.
  • On this window (see screenshot below), select the user that is stranded and click Delete.

This will release the user lock.

An alternative method is to remove the stranded user record directly from the ACTIVITY table which can be found in the DYNAMICS database. IMPORTANT – Do not delete the user record unless you are absolutely sure the user is not currently working in the software. Removing the stranded record while data is being entered or edited by the user will result in data corruption.

For more information or additional assistance, please click here to contact us.

Don’t forget to ask about our Dynamics GP training course designed specifically for system administrators!

Removing a stranded user in Microsoft Dynamics GP

(Click to enlarge)


Expand

How to disable the Home Page in Microsoft Dynamics GP

With each new release of Dynamics GP, the Home Page keeps getting more robust.

For the last few versions of GP we have had the ‘To Do’, ‘My Reports’, ‘Quick Links’ and ‘Connect’ sections.

With the introduction of GP 2015, Microsoft has added even more functionality. Users can now choose to see the ‘Time Management’, ‘Project Time & Expense’ and ‘Procurement’ sections as well.

The Home Page is specific to each user ID so customization of this page will affect only yourself.

To enable or disable specific sections of the page is quite easy. In fact, one can completely turn off the home page by disabling all sections. Some users prefer to work with a blank background, as they find the multiple home page sections to be a bit cluttered and busy.

To disable specific sections or to turn off the page completely:

  • Click on the ‘Customize this page’ link on the upper right corner (first screen shot below).
  • You will now have the option to check or uncheck the box for each section (second screen shot below).
  • Removing all check marks will turn off the home page completely (third screen shot below).
  • Alternatively, your system administrator can disable the home page for all users by simply running this query against the DYNAMICS database:
    UPDATE DYNAMICS..SY08100 SET Visible=0

For more information or additional assistance, please click here to contact us.

Ask us about our ‘Introduction to Dynamics GP’ training course which covers the home page in greater detail, along with all other system wide functionality.

How to disable the Home Page in Microsoft Dynamics GP

(Click to enlarge)


How to disable the Home Page in Microsoft Dynamics GP

(Click to enlarge)


Screenshot-(41)

Expand

Why is user security not working in Dynamics GP?

Microsoft Dynamics GP uses a role based security method to manage user access for all windows in the system. Additionally, with the use of Field Level Security, the system administrator can restrict access to specific fields within each window.

From time to time we are told by clients that the security settings, whether role based, or field level, simply do not work. Creating new roles, modifying existing roles, deleting and recreating the user, among other things, have been attempted in hopes of fixing this issue.

However, the actual fix is as simple as a check mark.

  • Open the Company Setup window (Tools>>Setup>>Company>>Company).
  • Place a checkmark in the Security checkbox in the center of the window.

Doing this will activate the company security that has already been put into place. Problem solved.

For more information or additional assistance, please click here to contact us.

Don’t forget to ask about our training course that covers creation of new users, user security and other system administrator functionality!


Why is user security not working in Dynamics GP?

(Click to enlarge)


Expand

How do we grant access to modified reports in Dynamics GP?

The Report Writer in Microsoft Dynamics GP can be a powerful tool. It allows modifications to all of the ‘out of the box’ reports that automatically get installed on day 1. This includes check stubs, customer statements, trial balances, invoices etc. Just about everything printed out of GP can be modified using this tool.

Most users, upon their first experience with the Report Writer, encounter a somewhat confusing issue. After modifying the report, you then proceed to print a test copy. However, the recently made modifications fail to appear on the report. The reason for this is simple. Dynamics GP will always print the original version of the report, until you tell it to do otherwise.

To do that:

  • Simply open the Alternate/Modified Forms and Reports window (Tools>>Setup>>System>>Alternate/Modified Forms and Reports).
  • Select the Alternate/Modified Forms ID that is attached to the user on the User Setup window.
  • Select the product – in this case it will be ‘Microsoft Dynamics GP’.
  • Select the type – in this case it will be ‘Reports’.
  • Select the series – for this example we will select ‘Purchasing’.

After a moment or two, the Purchasing folder will appear in the bottom portion of the window.

  • Expand it by clicking the plus sign
  • You will see a list of each modified report within the Purchasing series.
  • Locate the report you just modified
  • Expand it by clicking the plus sign.

You will now see two versions of the report – the original version and the modified version.

  • Activate the modified version by clicking the radio button to the left.
  • Click the SAVE button and run the report again.

You will now see the modifications.

This step only needs to be done once for each modified report.

If you proceed to make additional modifications to the same report, you will not have to activate it again, since it has already been done.

For more information or additional assistance, please click here to contact us.

Don’t forget to ask about our training course for the GP Report Modifier!


Microsoft Dynamics Tips & Tricks - How do we grant access to modified reports in Dynamics GP?

(Click to enlarge)


Expand